Friday 12 December 2014


Fox Manor


The Second Floor - The Lady's Dressing Room/En-Suite


Hi Everyone,

Thank you so much for your lovely comments on my Lady's Bedroom, and I'd love to welcome to my new followers, I appreciate each and every one of you.  I can't believe I have over 50 followers and have had 5000 page views, wow!  Thank you for making my enjoyment in building and decorating my Manor more special.

Now, the Dressing Room.  The Dressing Room is attached to the Lady's Bedroom and has an En-suite off that.  Sounds heavenly, doesn't it?

This space is directly above the Gent's Study/Hall and was originally supposed to have been a stairwell.  Again, I have a hall here leading from the Lady's Bedroom to the rest of the Manor....and yes, your imagination has to be fired up here! :)  I also have the Dressing Room and En-suite as well.  I was afraid I wouldn't get everything I wanted in here, but I think I have successfully achieved what I set out to do considering I am working with a total area of 10" x 15"!

I papered the ceilings as I had to fill in the hole from the stairwell, just in the same way as I have on previous floors.

 
The original hallway, with the hole for the stairwell filled in...I have such a lot to fit in this space!
 

The Hall area was papered with the same paper I have used in the halls throughout the house, just for continuity....and I really love the soft colour of it.  The flooring is an offcut of walnut flooring, as is the skirting.  The little table is just so beautifully detailed and fits in the hall perfectly and I placed the lamp to the far left so it can be seen from the bedroom.

 
The debacle with the installation of this doorframe leading from the bedroom to the hall is fully documented on my previous post on the Lady's Bedroom :)  You see...no door!

I decided to paper the En Suite with the same paper as the hall, but in the deep burgundy colourway.  I thought (rightly or wrongly) it would contrast nicely against the bathroom fittings, and be a dramatic contrast to the delicate furniture and décor in the Bedroom and Dressing Room.  The original doorway to the room on the right, has been closed up and papered over to make this an enclosed room.


The shower cubicle was slight seconds that's why I have it taking a little bit of a back seat...but I think it looks just right here.  I know you won't be able to see all of the items in here, but, like the Gentleman's en-suite.....I know they are there.  The corner sink will be fitted on the right hand side when I install the wall.  The floor is, again, a card that I tiled with my favourite 'granite' tiles, and kept slightly high to enable the wiring from the study below to pass under.


A view of the layout of this area.  The Hall to the left and the En-Suite to the right.
The Dressing Room will be in front with an entrance to the En-Suite.
 
 
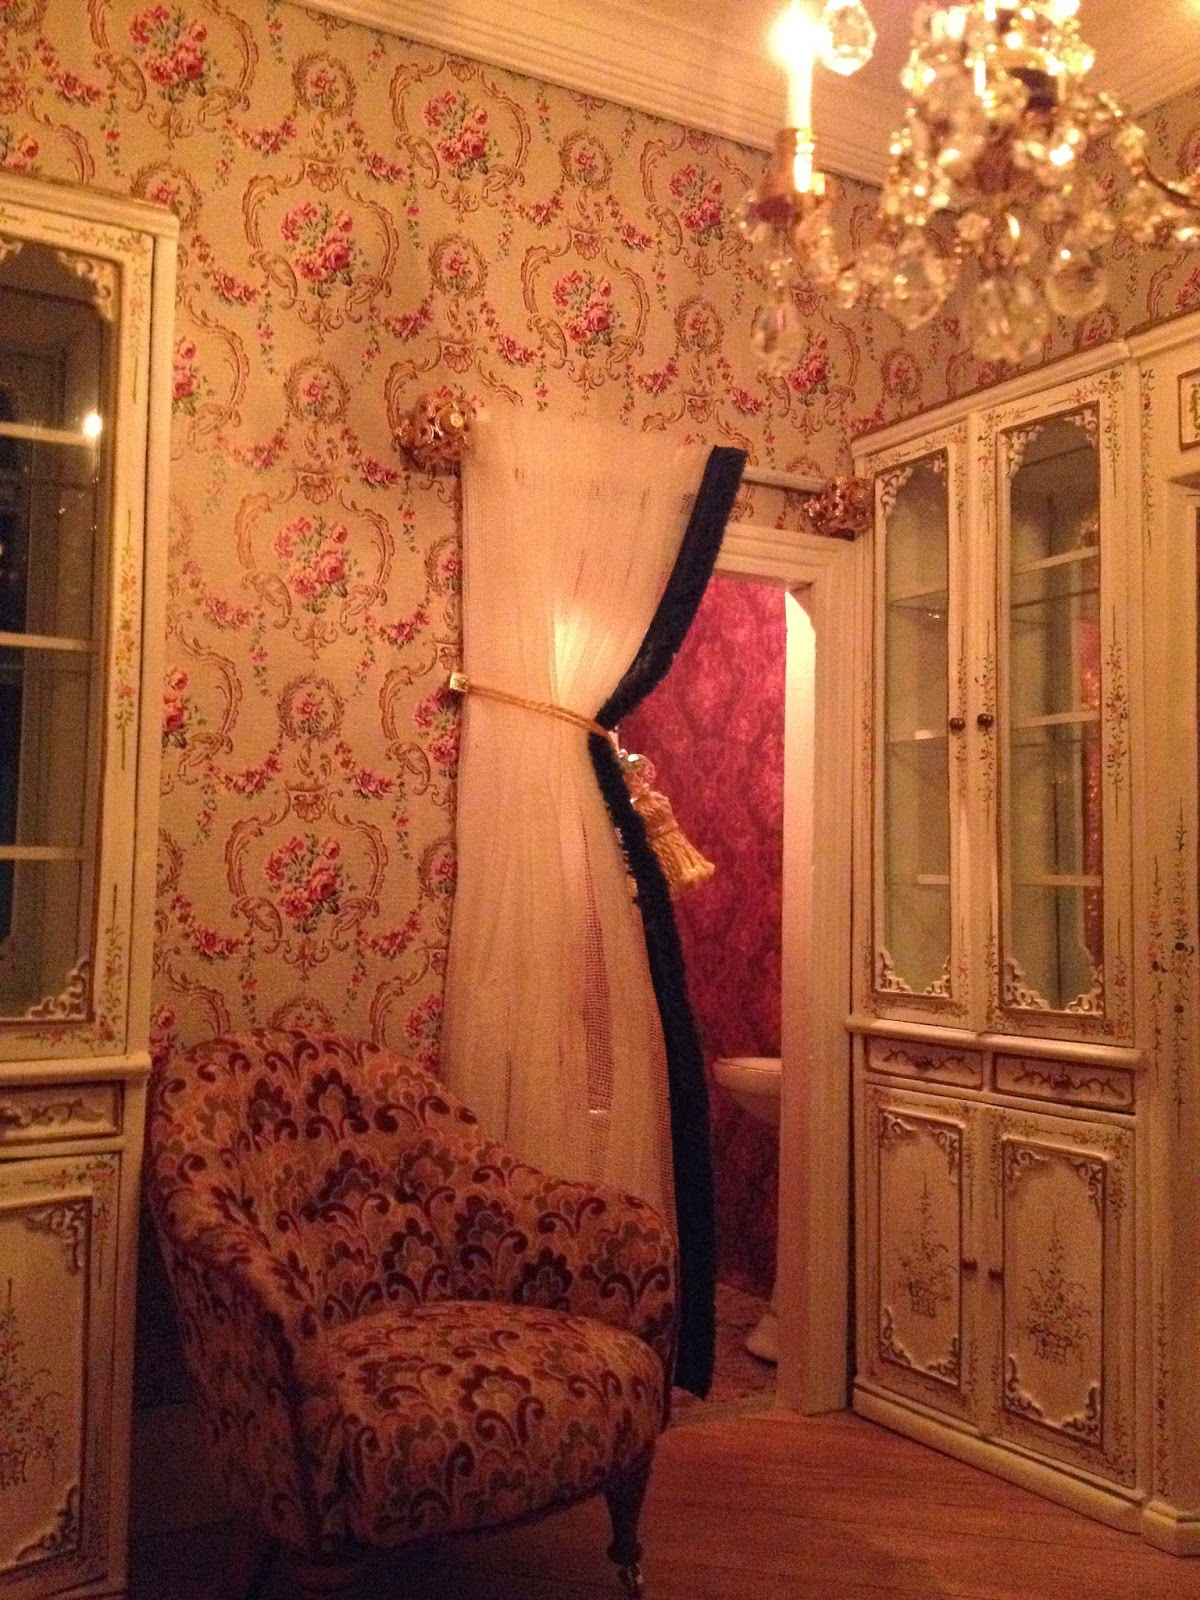
I papered the Dressing Room in the same paper as the Bedroom, Grand Bal by Les Chinoiseries,  and finished the doorway using the same Sue Cook plaster mouldings used in the Bedroom.  The doorway to the En-Suite is finished with a wooden surround and painted white. 

 
The Dressing Room wall has been erected and papered.


I had originally planned to install a glazed door leading from the Dressing Room to the En-suite, with a little curtain of Grand Bal by Les Chinoiseries behind it.....but my husband thought it would be an awful shame to hide so much of the En-suite, by having a door that could only open so far.  So, I am not adverse to repeating myself, and I decided to put a curtain here instead - just as I did for the Gentleman's Bedroom. 

I followed a wonderful tip given to me by Irene, when using the Pretty Pleater.  I had terrible trouble whilst working on my Gentleman's Bedroom curtain with the Pretty Pleater - the silk fabric just kept popping out of the 'ribs' no matter what I did.  Irene suggested wetting the pleater before using, and it was a brilliant help.  The fabric stayed put...yes!  I then sprayed the fabric with hairspray, as before, and when it dried, I arranged the folds to give a very high tie back style. 


I made the curtain in the Pretty Pleater, then I took it off to arrange the tie back.


Pinned to a high tie back for more visibility into the room.....and because I like it!

I went with this arrangement to give more visibility into the En Suite, and so that the curtain and tie-back wouldn't 'crowd' the gorgeous chair.  I trimmed the curtain with the same green fringing used for the little stool in the Lady's Bedroom.  I made the tieback in a similar fashion to the one in the Gentleman's Bedroom.  The curtain pole was a skewer - initially painted gold, but then I changed my mind and repainted it white..:)  The fittings were made up of little jewellery findings.

 
I used a little faceted glass bead...so dainty!


Jewellery findings to make the supports for the curtain and pole.


The little chair in the Dressing Room, is wonderfully made by the very talented Kris Compas, and I thought it looked just fabulous here.


I think this little chair is gorgeous!
 

I painted part of the ceiling rose with some of the green paint used in the Bedroom...again for continuity and to give a little colour to the ceiling area.

The floor is a mirror image of the Bedroom.  Planks on a 45 degree angle, but going the opposite direction.  I put a little marquetry in the floor in the doorway between the Bedroom and Dressing Room, which I just love.  It gives the plain floor a little definition between the two areas.

I used the same Heidi Ott light fitting here as in the Bedroom, but in the slightly smaller size.


Views of the interconnecting rooms.
 
I always keep the floors below covered up when I'm working, just to keep things clean and dust free!


The furniture in the Dressing Room were supposed to be shop fittings, but I love the look of the units in here.

I still have a lot of nik-naks to fill the shelves, but, again, all in good time :)


A picture in the dark with the Manor lights on...you can just see the little corner sink in the En Suite, and I think the burgundy paper just glows.


Another view with the lights on!


From here you can see all areas of the Lady's Bedroom, Hall to the Bedroom, the Dressing Room and En-Suite.
The painting is called 'Windmill in Landscape' by Andrew Nicholls, it's so beautiful.  I have a couple of Andrew's paintings and I love each one!


I hope you have enjoyed this post, I know I tend to ramble on a bit, but thanks for persevering with me.....

My next room to be tackled will be the Lady's Sitting Room - but that may be a wee while away!

So until the next time, have a very Merry Christmas and a Happy New Year to you and yours.

All the best and take care...enjoy your weekend!

Vivian


Friday 24 October 2014

Fox Manor


The Second Floor - The Lady's Bedroom


Hi everyone,

I can't believe it's been so long since I posted on my blog, but we'd been very busy at home preparing for my daughter Caroline's wedding which took place at the end of September.  I had been doing a bit of RL decorating in preparation and it was just lovely to see her.  As you all know, she lives in Australia at the moment and came home to Ireland to get married.  It's so hard to believe it was two years since she was last home....  So bear with me, folks, my miniature work may be slow, but I still am working at it.....in my head anyway!

I also want to say a big thank you for your kind comments on my little corner display and to welcome my new followers, welcome along!

This floor is going to be called, surprise, surprise, The Lady's Floor.  This floor will be a lot brighter with delicate colours, in contrast to The Gentleman's Floor below!

Now, the first room on the second floor to be done actually stretches across two rooms.  The main bedroom for my Lady, is directly above her husband's below - to the left of my manor.

The second part, is her adjoining dressing room, walking through to her en-suite - lucky lady! This is directly above the Gent's Study.  This area will also house part of the hall going out from her bedroom and going back into the manor - yes, imagination is all important here!  It does sound very complicated, but it will become a lot clearer! :)  Here's hoping.....

The door to the back of the room is the main entrance to the hall, and the newly made 'doorway' to the front of the room will enable my Lady to enter her dressing room and then through to her en-suite.  Thanks to my hubby for that!

In the bedroom I painted the ceiling and part of the wall in a Crown Period Colour in 'Flagon', a lovely soft green.  The central ceiling mould started life as a picture frame - papered in the centre with 'Grand Bal' from Les Chinoiseries.  I then stuck a lovely 'rosey' ceiling rose in the centre.  I am happy enough with the result.  I do like to try new things.....:)

The remainder of the room was then papered with 'Grand Bal' with some moulding and picture rail added.

The lovely plaster door surround for the main entrance to the bedroom is by Sue Cook and painted white.  The other open entrance through to the dressing room has a plaster sides also by Sue and doctored by me with a makeshift 'skirting' top! I do have little brackets to add, but I will complete the dressing room first before adding them.

I was such a ding-dong when I was painting the door from the hall to the bedroom!  Do you want a laugh?  Well, I decided the best way to paint my door was to remove it from the frame.  In my 'concentration', shall we say, in doing the adjoining hall, I glued the doorframe in so I could get that little space finished.....yes, doorframe.  I didn't even realise that I hadn't the door put back in until a week later! :(  Talk about a handling, trying to get the door back on and still have it working.  BUT I persevered and fiddled about until I got it in and working.  THEN I realised I really should have painted more of the doorframe as you can still see a lot of brown from the hallway side, in the bedroom.  But I think I will leave the door slightly ajar to the hallway so the little light can be seen on the table, and maybe the doorframe won't be as noticeable.

I painted the bed canopy white, but highlighted it with green, red and pink paint - it's not in place at the moment as I still have a curtain to make and attach to it - and it will be a lot easier to work with if it's not attached to the wall.

The fireplace is from Reutter, and I have been just waiting for somewhere to put it.  I think it's lovely.
The hearth is made from mountboard and, again, scored to imitate slabs, done in the same way as the hearth in the Games Room.  I have the wire for the fire running along the base of the skirting board in a little hollow that I left by making the floor a few millimetres shy from the wall.

The floor.  I think this floor took me so long to do, as I couldn't decide what I actually wanted here.  The making of it was fairly quick once I decided what I was doing.  I just laid plank flooring at a 45 degree angle.  I waxed it, and didn't like it....so I put a darker wax on top and I am a lot happier with it now.  It's a plain floor, but I think the ornate furniture really stands out against it.


I made the little stool at the bottom of the bed myself :)  I wouldn't like to put it to the test and have someone sit on it.....but I think it looks very effective :)  I have covered it in 'Grand Bal' silk by Les Chinoiseries to match the wallpaper.


I had already bought the light fittings for the Lady's Bedroom and Dressing Room.  They are by Heidi Ott and I think they are very sumptuous for a bedroom.  But I am that type of girl :)  Girl, who am I kidding! Lol.  Anyway, I love a bit of bling, as long as it's tasteful.


Here's a few more pictures of the bedroom.  I have hidden the view to the dressing room with a box, but all will be revealed when I get it finished :)


Ignore the blue tape, it helps to keep the lower floors covered and clean....:)

So there we have it.  The Lady's Bedroom is nearly complete.  I still have to dress the bed, install the bed canopy with curtain, and perhaps a rug to bring a bit of warmth to the room, but, all in good time.

Thank you for looking at my Lady's Bedroom and I hope you have a lovely weekend.

All the best and take care,

Vivian


Just a little snap of Caroline and her new husband, Aaron.....taken by me, so it's not the best:)


Saturday 9 August 2014

Fox Manor

A Quiet Corner.......Something to do!


Hi everyone

I hope you are all having a lovely weekend :)

Thank you sincerely to all who comment on my work and leave such lovely feedback, I really appreciate it.

I have been waiting patiently (for the first time in a long time) on supplies to continue with the second floor of my manor - namely The Lady's Floor.

With not being able to do a great deal on the construction side, I turned my mind to other things, and, as it happened the Lady's study furniture wasn't really going to fit into her planned sitting room, (along with everything else) so I hijacked the husband into making me a little corner display for it. :)


A very important stage :)  The Planning!!!!  I love this part, deciding what to use and what will go where :)  Here's the lovely little unit my husband made, in the raw stage, wood top and bottom and mdf sides....ah........the smell of timber - lovely.....  It is about 7 3/4" on the straight sides x 10 3/4" high (inside measurements).


The box of Ferrero Rocher chocolates on the book table were bought for me by my number two daughter, Caroline while I was in Australia visiting her over the New Year.  Ah, memories :)  I almost forgot, the two blue jug/vase ornaments on either side of the fire in the oriental sitting room were bought for me by Caroline as well.  Yes, I am a spoilt mother.........


I wallpapered the unit with the only sheet of Venittien wallpaper I had from Les Chinoiseries.  When I bought it, I loved it, (and I think it was the last sheet they had) - but had no idea what I could do with one sheet.  Well, here's what I did with the one sheet :)


I wallpapered the back sides of the unit with some left over wallpaper from my own living room - pictured here next to my brick chimney breast and put some green baize/felt? on the base to protect my furniture.

I always had intended to get one of these little display corners made to display my chandeliers - I might make some to sell on at a later stage, so the light here isn't fixed in permanently, just in case it looks droopy to you.  I wouldn't leave anything like that intentionally!


I embellished the non-opening door with a lovely 'ribbed' moulding and put on two little findings in the corners and painted over the whole lot in the same paint as the wainscot.

The pictures were copied onto old style parchment paper and put into these lovely frames that originally had dreadful copies of what should have been lovely prints.  Anyway, I'm delighted with my little birds! :)

Oh, the floor.  This was done using little strips of quite thick parquet style wood.  I bought that some time ago off ebay, but again, there wasn't enough to do a full room, so waste not want not :)  Here it is, stained and waxed - and looking quite lovely I think :)

I still have to make the little things to put in here, such as stationery on the desk, and some books in the book table, but, again, it'll take time! :)

Well folks, there you have it.  My first little corner display.  On show in my living room.  Even my husband, dear help him, likes it.......I love it.

So if you have any orders needing fulfilled......let me know :)

All the best, and enjoy what's left of the weekend.

Vivian

Tuesday 29 July 2014

Fox Manor


The First Floor - The Games Room


Hello everyone,

For my new followers, welcome to my blog; and to my regular visitors, thank you for sticking with me and making this such an enjoyable experience :)


The Gent's Games Room is on the first floor directly above the Sitting Room and the last room to be completed on this floor.  I was aiming for the décor in here to have the look of faded grandeur to it.  Like the Lady of the house, I don't like to do messy or untidy; but I know my Lady is tired of trying get her husband to update and redecorate his games room where he and his gentlemen friends love to retire to after dinner in the evening. :)  The ceiling is now smoke stained and the once pristine paintwork is now a dirty colour.  My, my, when men decide to light up their cigars and pipes, they do such damage to the woodwork and wallpaper....:(   I know, I know, I get a bit carried away sometimes! :)


The ceiling here was made by 'framing' the ceiling area with wood, and dividing it up with smaller wooden strips.  I didn't need to cut 45s here as the wallpaper on top would be finished like that.
 

I covered the wood by cutting up pieces from ordinary embossed wallpaper used in RL decorating.  In fact, I used this paper to cover the Entrance Hall ceiling.  The wallpaper pieces cover the bulk of the bare wood and are now glued down.
 
 
 I painted the whole lot with Crown Suede Effects paint in Chocolate Suede.  This paint left a textured effect, which I lightly painted here and there with walnut wood stain.  The paint is still wet here, and it looks a dreadful colour, but dried out better :)
 
  I painted the brass stampings with a bronze tone paint, glued them on and highlighted other areas of the paper with the same bronze paint.  I had to move the hole for the central light too...a job I seem to have to do quite regularly...is it just me? lol.  I wanted it more over the snooker table than further back into the room.  I have the ceiling completed, it's been painted, stained and highlighted!
 
 
 A close up....


The three ceilings at once...they are always in reverse (as I like to keep the front of the rooms to me as I work); the Games Room ceiling shown on the left here, is actually on the right when the piece is turned and put in place. The study ceiling hadn't been finished when I took this photo.


The floor was made up from left over parquet wood pieces from the Gent's Bedroom, and I decided (after two discarded attempts) to keep the pattern of the floor similar to the bedroom, but I placed the infill planks at an angle just to be visually different.  The wood was cherry and the infill, rosewood.  All stained brown mahogany...it was just too bright!

I decided to raise the 'card playing' area at the back of the room, just to give a bit of interest to the room and so it would be seen past the snooker table which is quite large and imposing in any room!  I really don't make things easy for myself, do I?

I have papered the room in Orleans by Les Chinoiseries.  Even though it is a floral paper, I think there is something dusky and masculine about it. 


I made thick cardboard templates for the raised seating area, as I intended to make this little structure from card and foamboard etc., but at this point....wait for it....my husband OFFERED to make it for me from MDF....well you could have knocked me over with a feather.  Never one to refuse a kind offer of help, I let him tear away, lol.   Sure enough, I had my two pieces for the seating area in a matter of minutes (instead of the hours it probably would have taken me to assemble!) :)  Mind you, I secretly love to paddle away myself, but the odd bit of help will never go amiss!


I used left over pieces of wood from the floor to cover the raised area - I must honestly say, here and now, that I really had no idea of how I was actually going to finish off this area, and it was really just a matter of fiddling about with the bits and pieces I had with some trial and error to see what I liked. The wood was cherry with walnut at the step area.  Again, all stained with brown mahogany.


After staining, I added the wooden 'scroll'? end pieces/room dividers (I'm not really sure what these are called) and glued on little findings just to define the area.  I was afraid it would get 'lost' in the room as it is generally a dark room anyway.....intentional I might add :)


The wainscot was made up from skirting board and dado rail glued to picture mount board and painted with the same paint used on the ceiling and given similar treatment with the woodstain.  The 'wood engravings' on the mid panel, are all that was left over from the embossed RL wallpaper....well, waste not want not! And, I was hoping it would help to tie in with the ceiling. :)


I think this is the best picture showing the colours of the room.....mind you, I certainly won't win any prizes for photography :)


The fireplace is a much softer yellow sandstone effect than I can get on the photos.  I made the 'slate' hearth from a piece of black mountboard, used black marker on the edges and then scored lines on it to make it look like it was made up from pieces of slate.  I am very happy with it.

Simple but effective...the darker line to the left hand side, has been scored out so I can place the wiring for the fire down into it.


A partially stocked bar!  Give me time :)


Good representation of colour - except for that glare on the back wall!

I lowered the snooker/billiard light so it would be out of the line of sight for the card area, (and that's where I felt it should be anyway!) and that's partly the reason I raised that area too.  I attached a finding to the light fitting and added the chain as well.

I have used a lot of little findings and brass stampings in the Games Room.  I think this particular room lends itself well to these little touches.  On their own you'd imagine them to be feminine and dainty, but somehow I think they look right at home here. :)

My daughter, Siobhan informs me that this is her favourite room in the house; partly because of the ceiling and the raised area at the back.  I have to say, that I seem to love each room as I do it, and at that particular point in time, the current room is my favourite....if you know what I mean.

When the house is finished, I imagine I won't be able to pick an outright favourite room - it would be like trying to pick a favourite child....lol :)


 The top banner on the family crest reads 'Sionnach Abu' pronounced shunny aboo - which is loosely translated as 'The Fox to Victory' in Irish.  Then the name of Fox is on the bottom banner.  It looks very white here, but it is actually printed on old parchment which is a soft cream colour.
 
Someone has polished off the contents of that decanter - there's not even a drop in the discarded glass either!  :)


I hope you have enjoyed my Gent's Games Room.  I still have a few more bits and pieces to buy......

That's the first floor finished (or 2nd floor for my USA readers!) - would you believe, I have my house (with basement) on a low coffee table for display.....I now need a set of steps to get to the next two floors :) I'm only 5'1" and this house is really big.  I imagine that this is going to really slow down progress now...I hate steps even if they are little ones!!

All the best and take care.

Vivian